1. Knife Sharpening on Stones Article
When it comes to knife sharpening, there are a lot of different techniques and opinions. Various techniques have different purposes, and are better for different problems and blade types. For simplicity’s sake I will tell you what the average user needs to know in order to sharpen an ordinary dull knife.
Let me start by saying that for the average knife user, the best way to sharpen your knife is to get it professionally sharpened, then skip to Step 6 and focus on edge maintenance. But for those of you who want to learn to do it yourself, here is my guide on how to sharpen your blades using stones.
Step 1. Clean Your Knife.
Make sure all the dust and dirt is cleaned out, and your knife is dry and ready to be sharpened.
Step 2. Get Out And Prepare Your Stones.
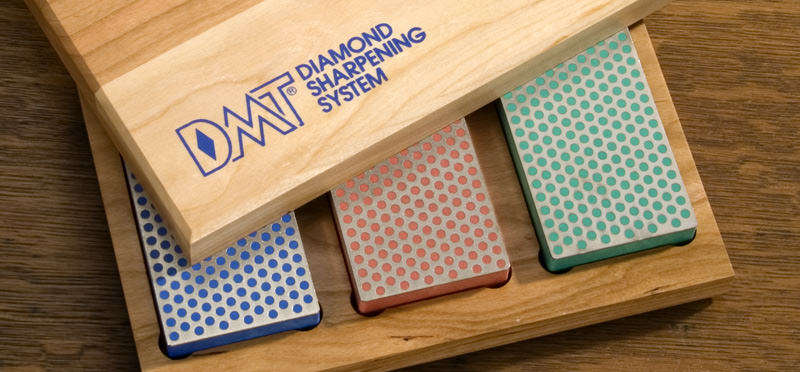
You will need several grits (or levels of coarseness). Typically you have a coarse, medium, and fine grit stone. For this article I will be using diamond stones, but I will use notes to keep water and oil stone users in the loop. I use DMT diamond stones; I have found their diamond dust holds a lot longer than other brands. Note that most diamond stones do not need any lubricant, and I use mine dry. If you really want to, you can use water to lubricate your diamond stones, but never use petroleum based oil on them unless directed otherwise by the manufacturer.
Regular Stones Note: You will need to make sure your stone is flat. Diamond stones do not need flattening, but over time natural stones will develop dips in their surface - which will affect your edge. Use a larger, flat, coarse stone to sand the stone to a flat level.
When you begin sharpening your knife with water or oil, slurry (swarf) will accumulate on top of the stone. You want a moderate amount of slurry on top of the stone, because the fine particles will improve sharpening process to develop a finer edge. However, you do not want too much slurry on top either, because you need to be able to see what is happening to the knife.
Water Stones Note: For those using water stones, you will need to thoroughly soak your stone in water, usually for an hour. So practice your sharpening somewhere you do not mind getting wet. If you do it on top of towels, make sure they are as level as you can get them. You will from time to time need to add more water to the top of the stone.
Oilstones Note: Oilstones require honing oil to be placed on the stone to lubricate the sharpening process. Use enough to slather the surface. Do not use honing oil on a water stone. A stone that has been used as an oilstone cannot revert back to being a water stone. You can see me apply honing oil to my stone in the video under Step 4.
Step 3. Find The Correct Angle.
.png) Different knives will have different angles. For the average everyday carry knife, I suggest a 15-degree angle. This sharp angle will get you a fantastic slicing edge that will be razor sharp. Keep in mind that bigger knives, hatchets, and other tools designed for tasks other than slicing will have a wider angle. The very most important part of the sharpening process is finding your angle, and then keeping a constant angle throughout the sharpening process.
Different knives will have different angles. For the average everyday carry knife, I suggest a 15-degree angle. This sharp angle will get you a fantastic slicing edge that will be razor sharp. Keep in mind that bigger knives, hatchets, and other tools designed for tasks other than slicing will have a wider angle. The very most important part of the sharpening process is finding your angle, and then keeping a constant angle throughout the sharpening process.
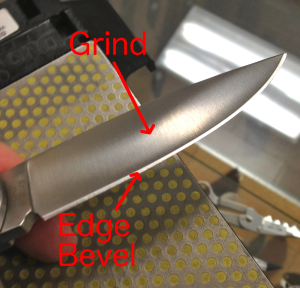
Let me explain a little about knife bevels before I describe how to find your angle. On the average blade, there are at least two bevels. You are trying to find the bevel on the very edge of your knife. We call this the Edge Bevel. The biggest (widest) bevel is referred to as the grind.
Find your angle by starting your knife straight up and down at a 90-degree angle. Cut that in half by approximately half to 45-degrees. Cut that in half again to 22.5-degrees. And then go down just a little bit more to make it 15-degrees.
If you are having problems finding your angle, or you are not sure what angle your knife is set to, a great trick is to use a marker and draw along the edge bevel. Take your blade and do two strokes along the edge. If you find that only the marker at the very edge of the bevel is coming off, then you are holding your knife too high, and you need to lower the angle. If the marker only comes off that transition between the edge bevel and the grind, then you are holding the knife too shallow, and should raise the spine a little more.
Step 4. Begin your strokes.
There are several different techniques and different types of strokes, each with its own tradition or purpose. As a reminder, I will be covering the most basic stroke, and then in other articles in the future I may take the time to explain other traditions, styles, and techniques.
Diamond is one of of the hardest materials on earth and will cut just about anything. However, you are not buying a really big diamond. You are buying about four layers of industrial grade diamond dust embedded in layers of metal. For this reason, do not put much pressure on a diamond stone. You do not need any more pressure than the weight of the knife itself. The diamond dust will cut without any real pressure, but if you put pressure on it, you will quickly scrape the diamond dust off of the metal holding the diamond dust in place. A diamond stone will last for years or even decades if treated properly.
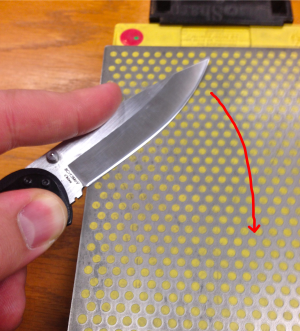
I call this the Forward Stroke. Begin your stroke at the back of the edge (the edge nearest the handle, also known as the heel). You should be moving the edge forward on the stone, so that the stone is peeling the steel particles back from the edge. Use an equal number of strokes on each side of the knife.
Note on Stones: Many natural stones do not take the Forward Stroke well, because some are too soft and the stone crumbles before the blade. Instead, some stones will require you to do the Backward Stroke, which is just the opposite motion of the Straightforward Stroke. Start at the tip of the blade, and draw the blade backward moving the blade spine forward, rather than moving the blade edge forward. You will have to research which kind of stone you have to know which stroke you need to use. In my opinion the Forward Stroke will give you a sharper edge and is easier to do, however the Backward Stroke is safer for your blade and stone. If you are unsure of what kind of stone you have, use the Backward Stroke. If you use the Backward Stroke, you will need to remove your wire edge, usually with some stropping if you can get it to a fine wire edge. See Step 7 for more about wire edges.
Watch the video below to see how I sharpen the knife.
Step 5. Moving Through The Grits
 For a dull knife I move through coarse, fine, and extra fine on DMT color-coded stones. DMT color codes their stones for easy idtenfication: coarse is blue, fine is red, and super fine is green. You may need to spend as long as 5 minutes on each side of the knife for each of the three grit levels, depending on your stone, your steel, and your technique (although it certainly could be, and often is, less time than that). Test your edge after each grit level until you are satisfied. You should have a toothy edge after using the coarse grit. Move on to the next higher grit level, until you have gone through all three grits.If your knife does not seem to be getting sharper after 5 minutes on each side, first check your angle. If that looks fine, the next thing to do is to move to a coarser stone.
Stones Note: Remember that modern steels are getting extremely hard. If you have super steel like ZDP-189, or really anything above an S30V, in your blade and you are using a natural stone, it will not be hard enough to sharpen your blade. This is another advantage of using diamond stones.
Step 6. Finishing with Ceramic Sticks
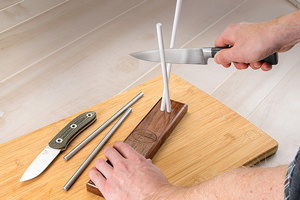
I always prefer to finish my edge to razor sharp with ceramic sticks. After that I use the ceramic sticks to simply maintain my razor edge. We use a special ceramic stick called Alumina in my Ceramic Sharpener. The nice thing about my ceramic sharpener is that it already has your angle on it for you. The rods are set apart at 30 degrees. When you hold your knife perpendicular to the table you are on, just straight up and down, that will cut the angle to 15 degrees for each edge.
Start at the back of the blade edge (the heel) and pull back on the knife AND push down on the knife at the same time at a constant rate. If the tip is rounded, round out with the tip. Put an equal number of swipes on each side of the knife. You can start out with some pressure on the ceramics (unlike with diamonds). After some pressure swipes, turn the rods to a clean surface and do some lighter swipes on your blade. You always want to start on the rod on your dominant hand’s side, and end opposite your dominant hand’s side. So if you are right handed, start on the right side, and end on the left side. This will angle the edge just enough for a perfect cutting edge for you personally.
Watch the video below for a demonstration of using a Ceramic Sharpener.
The ceramic sharpener is a fantastic way to finish up your knife with its super fine surface, giving you a razor edge. Another advantage of using rods is they will sharpen hawkbill and recurve blades.
Once your knife is sharp, you don’t have to go through the process of sharpening your knife over and over again. I use the ceramic sticks as a maintenance kit to keep my knives sharp. After I finish using my knife for the day, I wipe it off, and do two swipes. That is all it needs.
Step 7. Stropping Your Edge
You can finish off your edge with a little stropping action. This is really an optional and unnecessary step if you are already finishing your knife on ceramic rods. It is essential for a razor blade however, and if you aren't fine tuning your knife on ceramic rods stropping is a good idea.
When you are sharpening your knife (be it stone, belt, what have you), you will leave a very small little burr, referred to as a wire, along the edge of the blade opposite of the direction you last sharpened it. Stropping will remove this little wire, making your edge just a little sharper and allowing for easy shaving.
I am using a strop by Boker. The handle and double-sided leather strips are very convenient. You do not need to spend money on a strop though, really any strip of leather will do. Old belts, old boots, jackets will work. It is easier to do if you cut it into a strip and glue it onto a raise surface like the Boker strop is. You can even use old computer mouse pads for a strop instead of leather. Softer leather with a little bit of give works a bit better than hard leather, but most any will do. The Boker Strop is just convenient and already ready to go. We also have a guide on how to make your own leather strop.
Over time and with use, your knife will again develop a wire edge, even if you were not sharpening it. You can use a strop to maintain your knife and straighten out its edge. This is what a Butcher's Steel does. Most butcher's steels do not do any sharpening at all, they simply straighten out the wire edge of the knife, thus improving the cutitng performance. Of course most of the butcher's steels we carry are covered in diamond dust and therefore do actually sharpen the knives. We are perhaps a little out of the norm when it comes to sharpening. There are some who maintain their edge on a strop instead of ceramic sticks. With a strop you would only need to use the sticks every once in a while. Eventually straightening the edge will not be enough and you will need to actually sharpen it with the ceramic sticks.
If you really want you can add some compound on the leather for even greater sharpness. You can use Simichrome as a strop paste. It will be a little bit rougher than jeweler’s rouge. Jeweler’s rouge is used for polishing very soft metals like gold and silver, and is too fine for steel. Put some Simichrome on your strop and that should do the trick (but usually I just strop dry). If your leather is too crusty, add some oil to it to soften it up before stropping. Any oils used for maintaining leather will work to soften up your leather for more use.
With stropping you do the opposite of the forward swipe on the stones. You bring the knife edge backwards over the leather. This straightens out any burrs on the edge giving you a supreme cutting edge. Do not put a lot of pressure on your blade while stropping, go light and easy.
Watch this video below to see how I strop knives.
FAQ
1. How do I get nicks out of my edge?
The easy answer is to take your knife to a professional sharpener who knows how to properly use a belt grinder. Doing it on a stone is a little more complicated, and I will have to make a separate article for this subject. But in effect you want to focus on the area where the nick is assuming it is not too deep. Take care to keep the entire edge on the same level that you take the nick down to. Instead of just using the forward stroke I taught in the article above, use some careful circular motions on the nick. After that, finish the blade with the forward stroke to make sure the edge lines up along the whole blade and your edge is straight and even all along.
2. A.G., I want a wider angle than 15 degrees. Do you have any sharpeners for wider angles?
Answer: In my opinion, a slicing knife should be set at 15 degrees. But if you want a wider angle here are two great products for that. The Spyderco Sharpmaker will offer a both a 30 and a 40 degree angle for your knives. The DMT Guided Diamond Sharpener will also allow for multiple variable angles. It is a little small for knives over 7 inches, and you may have to do those by hand on a stone.
3. How do I sharpen my serrated edge?
To sharpen serrations, you will need a small diamond cone sharpener. Go down each serration with the needle of the cone until the cone gets too wide. After that take your sharpener and run it flat against the backside of the serrations to take off the burr (a burr is the more aggressive form of a wire edge). The Spyderco Sharpmaker also makes a fine tool for sharpening serrations. Just use the triangle on one of the points instead of using the flat of the rod.
4. How do I sharpen a dull hawk bill or recurved blade?
For those you will want to use diamond rods. I have created a field sharpener kit with both diamond and ceramic rods designed for just such a purpose.
5. How do I sharpen a convex grind?
Convex grinds are more complicated and can be difficult to do. I usually discourage new knife sharpeners from getting a convex ground knife. These are typically seen in axes and cutting competition knives, although they are also popular with Bark River fans. There are some very ardent supporters of convex grinds, please keep in mind this is just my personal opinion. You can use a stone to do it, but that can be a difficult technique to master and there are easier ways to do it. The best way to do it is to attach sandpaper to something that will give underneath it (like a mouse pad), and just go down the grits using backward strokes (like stropping). There are a few guides already on how to do this online, so I probably won’t write a full article on it unless I get a lot of people asking for one.
Thank you all for reading! If you have comments, questions, or want to request particular topics for future articles, feel free to drop me a line on Facebook, and I will do my best to get back to you.
Return to Sharpening Articles Page
Written by A.G. Russell III and Jake Broce August, 2016.