Lock Lever Terms
Here I explain some of the terms of the Lock Lever (also known as the Lock Bar). I have already covered most of the terms for the blade in my article Blade Parts for Slip Joint Folders, but I have them listed out again below. There are a couple terms added that apply to locking blades that I added, like the Lock Notch.
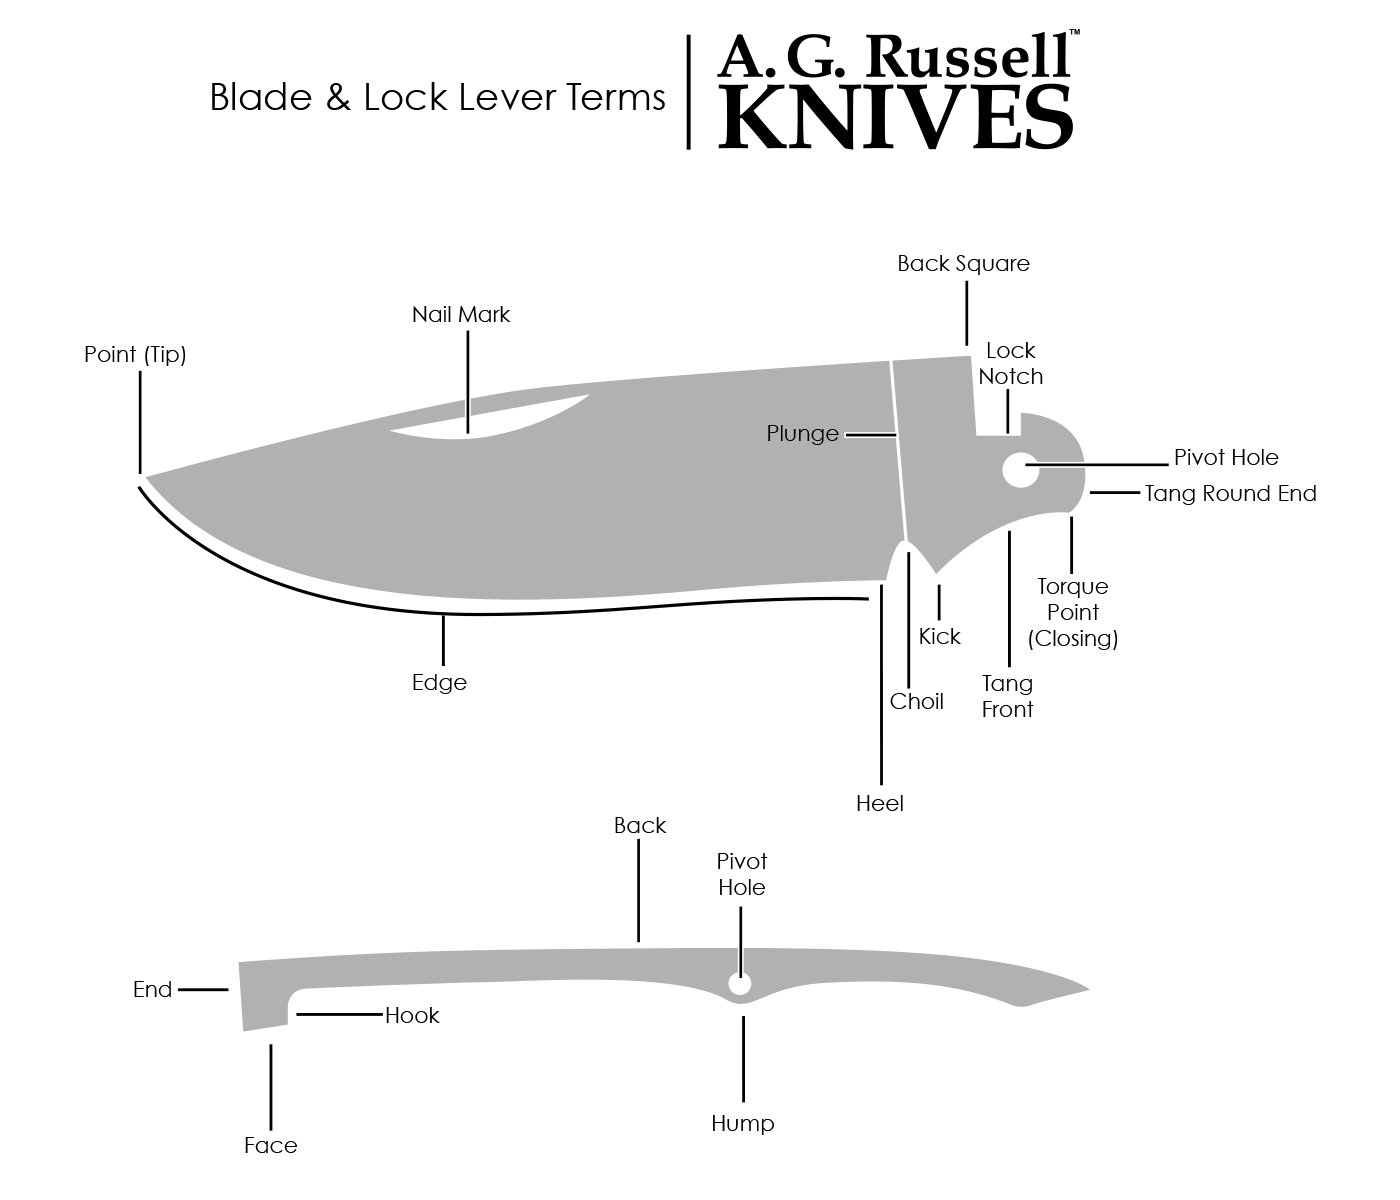
Lock Lever (or lock bar)
Back
The back of the Lock Lever, usually visible on the back of the knife.
Pivot Hole
Used to pivot the lever to unlock the knife.
Hook
This part of the Lock Lever hooks into the blade at the Lock Notch.
Hump
The hump is required to make room for the Pivot Hole. Sometimes blades which are snapped closed too forcefully will hit the hump, and damage the edge. If you find a chip in your edge, check to see if it lines up with the hump. Many older knives do this, and should be closed carefully. We use the Striker Pin to avoid this in our knives.
Face
Part of lock lever that the blade tang slides across while the blade is opened or closed.
End
Lines up with the Back Stop and at the top the Back Square. For a pretty knife, you want the top End of the spring to line up well and smoothly with the Back Square.
Blade Terms
Blade Point
The intersection of the front (edge) and back of the blade, intended for penetration or detailed cutting, very blunt on blades like the spey and very pointed on a blade like the clip point or stiletto.
Edge
In a well made knife it runs along the front of the blade from the tip to the choil. In a poorly designed or made knife there is either no choil or the plunge is too far toward the point, preventing the sharpening bevel to reach into the choil, this results in a poorly sharpened blade and ruined whetstones.
Choil
A small notch between the kick and the edge, allowing the edge to be sharp from tip to heel.
Edge Heel
The end of the edge, near the handle.
Plunge
The place where the grind begins leaving the tang unmarked. The ground area is much thinner, whereas the tang is much thicker than the ground area. The plunge is the transition between the two.
Nail Mark
The place cut or pressed into the blade where a thumbnail is used to open the blade. The common nail mark is crescent shaped, the long pull is used on blades with shorter clips and is a long narrow channel near the back of the blade.
Kick
A projection at the front blade end of the tang, in most old knives it rests on the spring stopping the blade edge from impacting the hump in the backspring.
Tang Front
Polished area between the kick and the torque point (closing).
Tang Back
Polished area between the backstop and the torque point (opening).
Tang Round End
The rounded end of the tang that results in a smooth transition of the blade from closed to open and open to closed.
Torque Point (Closing)
The small radius at the front end of the tang that moves along the walk of the spring causing the blade to snap closed. The tang round end is no longer putting up resistance to the spring, and spring - after passing the tang point - then pushes the blade into the closed position. This is important so the blade does not try to open only part way in the pocket.
Backsquare
The sharp corner at the handle end of the blade back that sticks above the handle when the knife is closed and seems to threaten to rip a hole in the pocket. If this is not sharp it will not look good when open. In pen knives this was solved by using “sunk joints.”
Sunk Joint
A method of hiding the backsquare by moving the pivot pin low enough in the handle that the backsquare is contained or nearly contained in the handle when the knife is closed.
Lock Notch
This is where the Hook of the Lock Lever (or lock bar) connects with the blade. The better the fit, the more lockup and less wiggle a blade has.
Pivot Hole
The hole through which the pivot pin holds the blade in place.