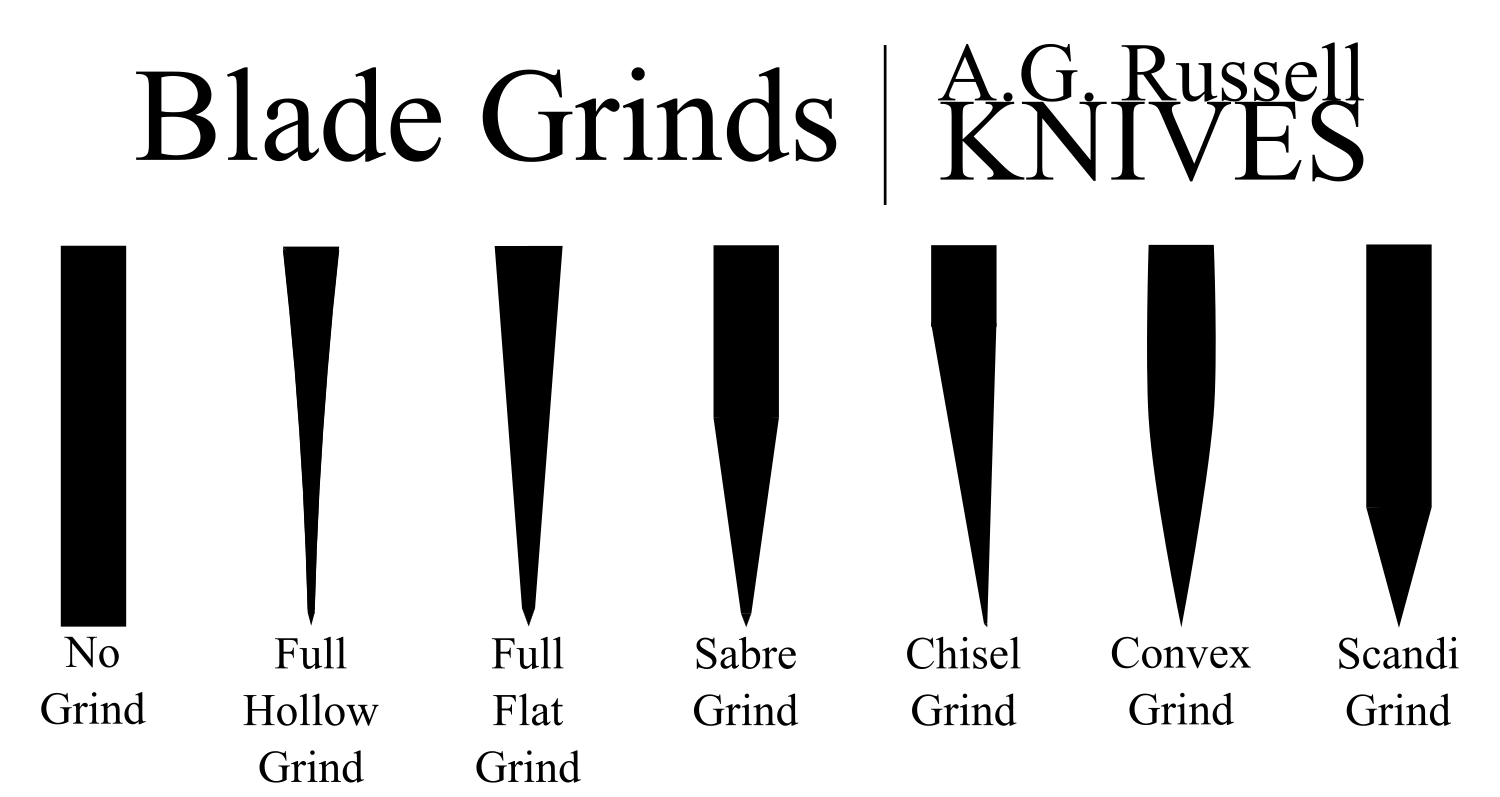
Blade Grinds
If you want to understand how and why blades are the way they are you need to study the blades made over the past thousand years. The surviving blades are those that worked for their users. These knives and swords were either flat ground or hollow ground; everything else is a variant of those two except the convex grind; which I will discuss below.
The grind on a blade lends itself towards different advantages and disadvantages. Some are stronger, others are sharper, and some try to find a balance of both. While each grind has its own strengths, the truth of the matter is that the width of the blade stock and the grind angles will affect the strengths of the blade much more dramatically than what type of grind is used. Everything I say below is wholly dependent on the grind angles and how thick the blade is. I will assume that the width and angles will be playing to the strengths of each of the grinds.
A Few Definitions
Concave – shapes that curve inward, like an hourglass. Think of how a cave curves in, or think "con-cavity".
Convex – shapes that curve outward, like a football.
Spine – the back of a blade, opposite of the edge.
Primary Bevel / Grind – Where the knife first begins to narrow into a cutting edge from the thickness of the main stock of the blade.
Edge Bevel – the Edge of the blade.
Swedge – An unsharpened bevel grind along a portion of the spine of a blade.
The Hollow Grind
 To make a hollow grind, the blade blank is applied to the surface of a grinding wheel or a belt passing around a wheel, taking a concave scoop out of the blade. The depth of the hollow will depend on the circumference of the wheel. This means that many hollow grinds will be very shallow, and indeed on many blades it is difficult for the unpracticed eye to spot a hollow grind. An easy way to check if a blade is hollow ground is to see how the light reflects off of it. Does it reflect from the whole surface, or does it bend as you move the blade up and down? If the light reflection bends it is a hollow grind. Hollow grinds are best used to remove a lot of material compared to other grinds, making a better slicer.
A full hollow grind goes from the edge all the way up to the spine. The Black Widow Caper pictured above is almost a full hollow grind; you can see that a bit of the stock on the spine is still left unground.
The hollow grind is popular for both production and handmade knives. If the designer wanted to change where the sabre line is (see sabre grind below), the diameter of the wheel has to be changed. Changing wheel size can be expensive for manufacturers and handmade makers alike, which may restrict hollow ground designs to particular sizes, or incur extra costs to make a particular design.
The hollow grind is usually done on a thin blade, and then ground to have a thin edge. As I explained in my article on Blade Edges, thinner edges are a little weaker but they also slice better than thicker edges. Hollow ground blades are fantastic at slicing. If you combine a hollow grind, a thin edge, and a nice deep belly, it will be one of the best slicing knives you have ever had.
One advantage of the hollow grind is that the blade does not increase in thickness as dramatically as other grinds do. This means that as you sharpen the edge, it will remain nearly as thin as when you first got your knife. This makes sharpening hollow grinds typically easier than other grind styles.
The hollow grind does have a disadvantage of course. Since there is less material supporting the edge, it can chip or roll over with hard use which make hollow grinds unfavorable in large format knives like machetes.
If you need your knife to be a supreme slicer, the hollow grind will perform admirably. Dressing your game requires a knife that has exceptional slicing to remove the skin. Hollow grinds are common on hunting and skinning knives for this reason. Another blade that uses the hollow grind is the straight razor. The extremely thin edge you can achieve with a hollow grind allows for easy push cutting with the straight razor.
Strengths: Fantastic slicing ability, easy to sharpen, easier to manufacture (can be subjective).
Best knife types: Skinners / Hunting Knives, Small to medium sized Everyday Carry blades, and Straight Razors.
Weaknesses: The edge can be fragile compared to other grinds. No chopping. Grinding wheel costs might limit blade design.
The Full Flat Grind
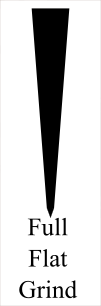 The full flat grind is as it sounds - the grind goes all the way down from the spine to the edge bevel in a flat, linear slope. The flat grind is one of the most versatile grinds. It can be thick and heavy, or it can be extremely thin and sharp. Or it can be a balance between the two. Most flat grinds are a balance between the two, though it will depend on the design.
The full flat grind is thickest at the spine for strength, but tapers down into a relatively thin edge for excellent slicing. More steel is removed from the sides, allowing for easier slicing and allowing the blade to move through mediums easier. A full flat grind will (typically) be stronger than a hollow grind, and cut better than the sabre grind.
The flat grind’s primary bevel slopes linearly and slowly. This allows the full flat grind to pass through materials with more ease than other grinds who slope non-linearly (hollow), or at steeper angles (sabre). This is why the majority of kitchen knives are flat ground - so they can pass through food easily without much resistance.
The full flat grind has a great mix of the strengths of the other two grinds. Because it is a great all-rounder, the full flat grind is one of the more popular grinds.
Strengths: Good cutting, strength, and chopping (depending on blade thickness).
Best Knife Types: EDC knives, kitchen knives, hunting knives. Honestly, it is good on most knives.
Weaknesses: Doesn’t cut quite as well as a hollow grind, isn’t quite as robust as a sabre grind.
The Sabre Grind

A sabre grind is either a flat or hollow grind where the primary bevel (the grind) does not cover the entire width of the blade, leaving some portion unground. If someone says “sabre hollow ground” you know the blade has a hollow grind that starts partway down the blade. The transition line between the primary bevel and the unground portion of the blade is referred to as the Sabre Line.
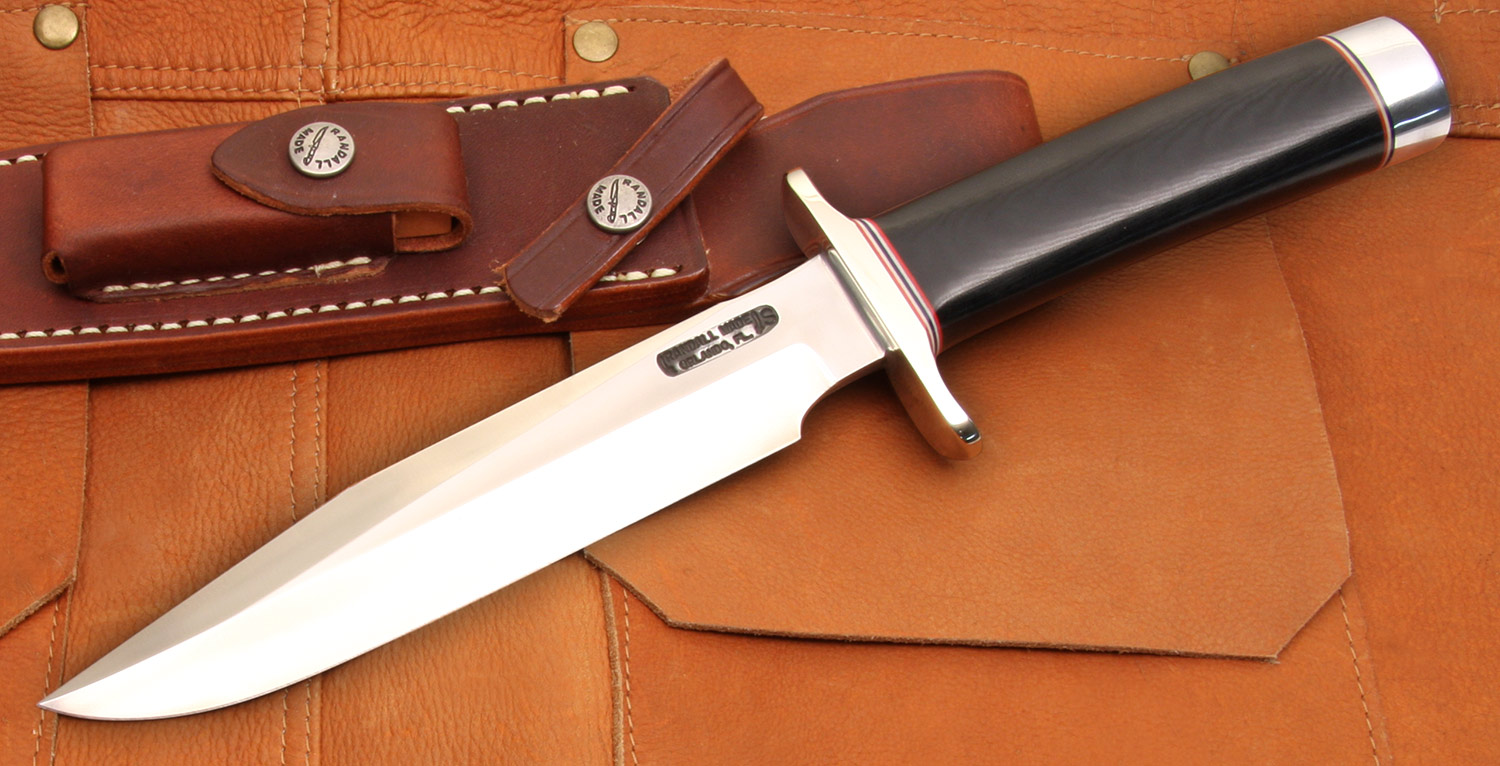
The sabre grind is used when the maker wants a stronger blade. To make full use of the stronger blade, often the stock is kept a little thicker so that the blade can stand up to hard use, such as chopping. With a thicker stock, the sabre grind will not slice as well as other grinds. Classic military designs such as the Randall #1 and the Ka-bar Combat Knife utilize the sabre grind.
Strengths: Excellent durability. It will hold up to chopping or penetration.
Best Knife Types: Military & Tactical Knives, Self-Defense blades, Camp Knives.
Weaknesses: Its cutting ability is typically less impressive than other grind types.
The Chisel Grind
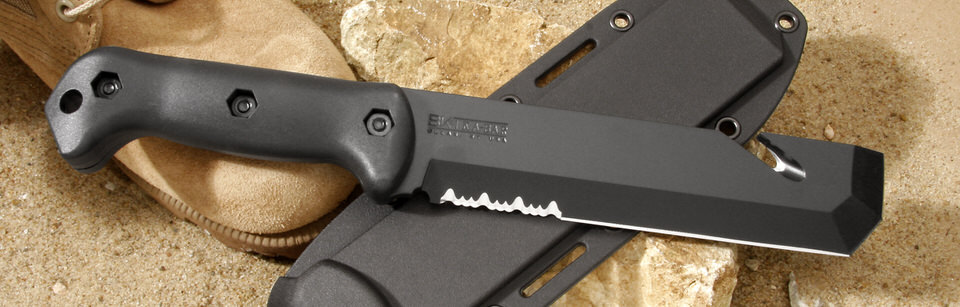
 The chisel grind is not ground on one side at all. It is completely flat on one side, and has the primary bevel only on one side. The chisel grind may or may not have a secondary edge bevel. The knife pictured above, and the profile diagram picture to the left, are both sabre chisel grinds. You can see how the bevel starts partially down the blade. A full chisel grind would have the bevel go all the way up to the spine.
The chisel grind is easy to make, as you only have to grind one side, and you don’t have to make the grind symmetrical with the other side. The chisel grind is also easy to sharpen for the same reason - there’s only one side to sharpen (and then strop off the burr). Because one side is left unaltered, the other side can be sharpened at a thinner angle, making for a thin, sharp edge.
Achieving accurate cuts is difficult with the chisel grind due to the unsymmetrical design. The blade will curve into the material being cut. So the knife will naturally slant towards the beveled side, causing the cut to be slanted as well. Sometimes this is preferable, such as with handmade Japanese Sushi knives. When cutting fish quickly, a symmetrical grind might suck the meat in on both sides, which might accidentally suck in the hand you are using to hold the fish steady. By using a chisel grind, you can have the blade cut away from your steadying hand, and the meat will not be sucked in on the unground side.
Chisel grinds tend to be rare, and are not used very often. Think of them as a specialized grind. Typically a knife with a chisel grind has a specific purpose. The Becker BK-3 Tac Tool shown above is designed to be a SWAT Team entry tool, it is in essence a sharpened pry-bar. The low sabre grind makes for an obtuse primary bevel angle, combined with a chisel grind, makes for a very thick and sturdy edge.
Strengths: Excellent strength, good chopping (depending on angle), easy to sharpen, can have great cutting ability (again - angle).
Best Knife Types: Sometimes found in choppers such as machetes or other bushcraft knives. Can also be found regularly in traditional handmade Japanese Kitchen Knives.
Weaknesses: Cutting is not symmetrical which can be confusing, performance can vary widely - depending on grind angles and design.
The Convex Grind
.png) The convex grind was found on the knives made by early American blacksmiths with no understanding of the way knives were made by those who made a profession of knifemaking in their day. Convex “grinds” were easier to make with a hammer, which is why they were popular in those early days. Nowadays, a slack belt grinder is used to make the convex grind. Convex grinds have also been made popular by the followers of the Moran cult established by the writings of Ken Warner about his friend Bill Moran. Consequently, it is also known as the Moran Grind. It is also sometimes referred to as the Appleseed Grind.
The convex grind was found on the knives made by early American blacksmiths with no understanding of the way knives were made by those who made a profession of knifemaking in their day. Convex “grinds” were easier to make with a hammer, which is why they were popular in those early days. Nowadays, a slack belt grinder is used to make the convex grind. Convex grinds have also been made popular by the followers of the Moran cult established by the writings of Ken Warner about his friend Bill Moran. Consequently, it is also known as the Moran Grind. It is also sometimes referred to as the Appleseed Grind.
The convex grind arcs down into a convex curve (arcs out) towards the edge. The convex grind is similar to the sabre grind in that it (typically) still has a lot of steel in the middle of the blade, making it the thickest of the three main types of grinds. This puts extra steel behind the edge, reinforcing and strengthening it. The convex grind technically does not have an edge grind (edge bevel), the grind curves all the way into the edge. In practice, convex grinds often do have a small edge bevel, or a "micro" edge bevel, especially after being resharpened.
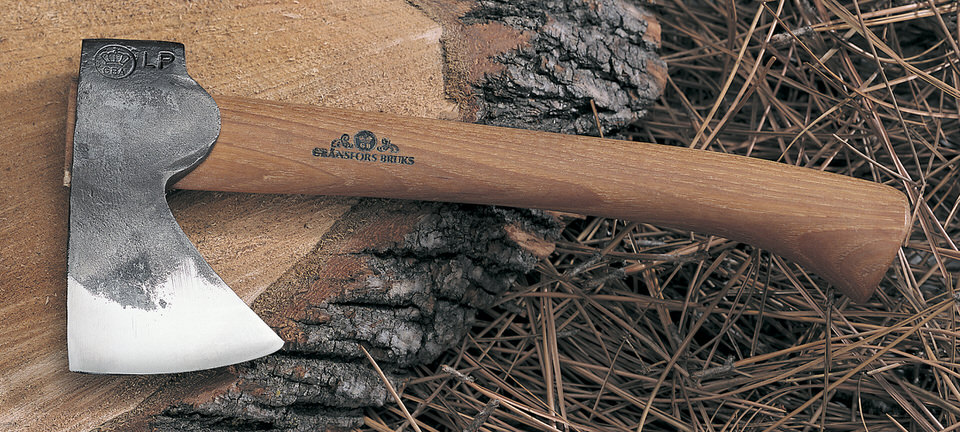
The main drawback of the convex grind is that can be difficult to sharpen. My method to sharpen convex grinds is to take something flat with a little give, such as a thick mouse pad, and put some sandpaper or an abrasive on it and use backward strokes (away from the edge) on the knife to give it a "micro" beveled edge. You’ll of course need to go through several grits to bring the knife back up to sharp. Afterward you’ll need to strop off any burrs since you are using the backward stroke method. Gransfors also offers an Axe Sharpening stone to sharpen your axe.
The convex grind is widely used with axes, and sometimes with machetes. Bolos and Kukris sometimes use the convex grind as well. The thick edge can take a beating without chipping or rolling. Not all choppers use the convex grind. You can get similar strength with a wide angle on a flat ground blade with a thick edge bevel.
In my opinion, the convex grind is useful only in large chopping blades and axe formats. I do not think the convex grind is useful in smaller knife formats. There are some who disagree with me. You will have to come to your own conclusion about it.
Strengths: Very strong edge, great for chopping.
Best Knife Types: Choppers, Machetes, Axes, some larger bushcraft knives.
Weaknesses: Difficult to maintain and sharpen - requires skill, and uncommon sharpening tools. Can have difficulty carving, not the greatest slicer. Performance can vary wildly depending on angles.
The Dual-Ground American Reinforced Tanto
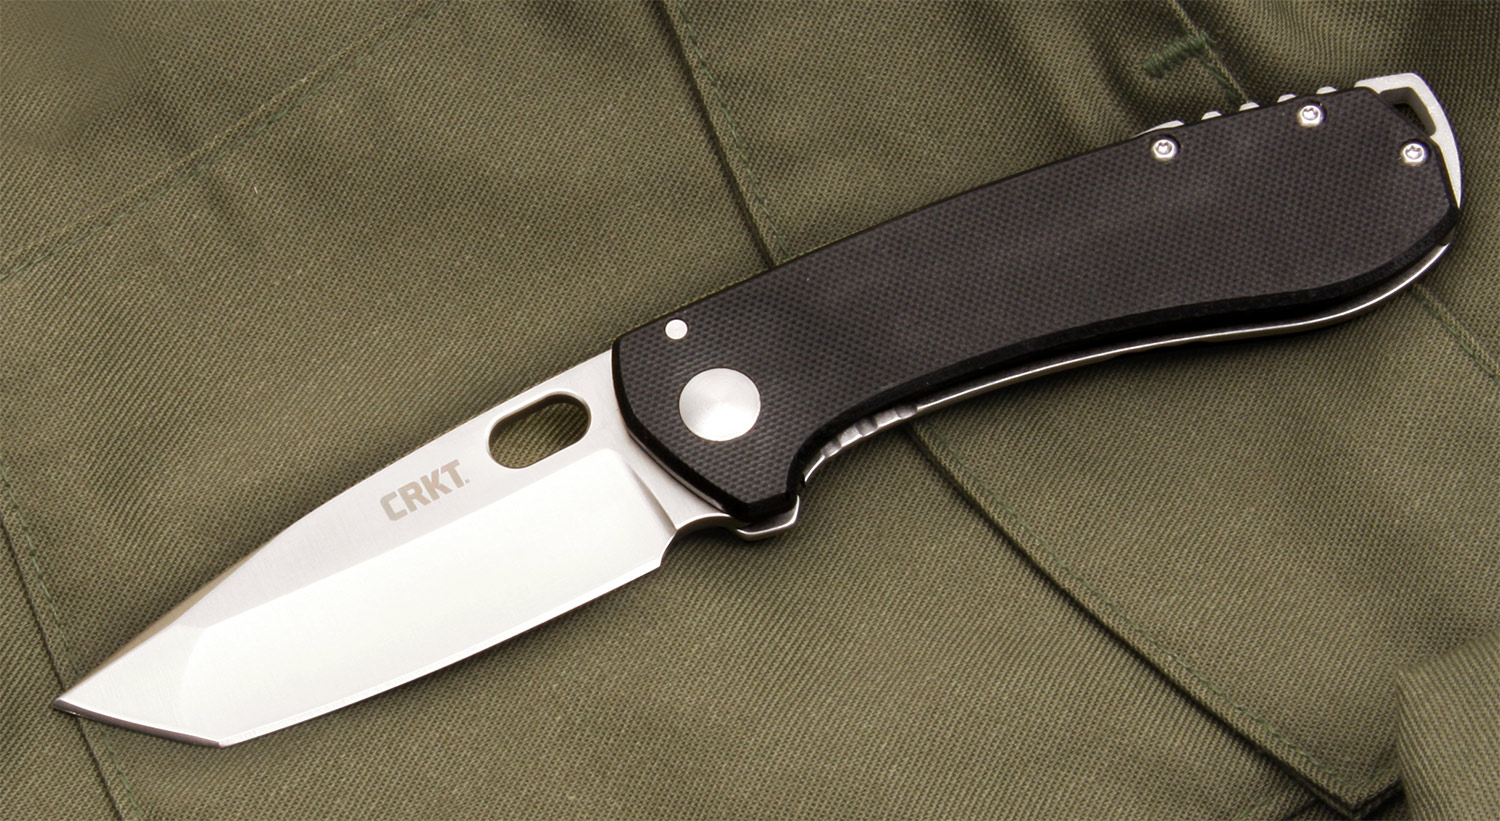
The American Style Tanto combines two grinds. Along the flat section of the edge, the blade is often sabre hollow ground. This gives the blade a thin, sharp edge. Along the front of the blade by the point, the grind changes to a flat or convex grind. This gives the tip incredible strength. The result is a sharp bottom edge with a strong tip - allowing for strong penetration. Of course this strengthened tip does not pierce as easily as say a double-edged dagger, but it will not easily break either.
I am not overly fond of the American Tanto for my personal use. It can look intimidating, and for that reason is it popular with the younger generations. The American Tanto can be difficult to sharpen the two different grinds and get all the angles correct - many have difficulty with the transition between the two grinds.
Strengths: Strong, penetrating point that won’t break easily, great cutting ability along the flat of the edge.
Weaknesses: Doesn’t pierce softer targets as smoothly as other grinds due to the extra steel at the point. The less steel on a point, the easier it will puncture. Can be difficult to sharpen.
The Scandi Grind

The Scandinavian grind, or Scandi grind, is a short flat (occasionally convex) grind on a thin blade where the primary grind is also the edge bevel. This means that you do not have a secondary edge bevel/grind at all; there is only the one primary grind which is ground to zero to make the edge, sometimes called a Zero Sabre Grind. This leaves a lot of material behind the edge, strengthening it.
The benefit to using a scandi grind is that you can use the entire primary bevel to guide your knife along the bench stone as you sharpen it. Just put slightly more pressure on the very edge to form a miniscule edge bevel (it won’t be visible). Of course, for this to be a benefit you have to use bench stones as your sharpening device.
The downside to a scandi grind is the flip side of the coin of having a lot of material behind the edge. While the edge is strengthened, it also means that you have to remove a lot of material to remove when you sharpen it. Personally, assuming I was forced to use one, I would attempt to make a "micro" bevel on the edge through the use of ceramic rods or as mentioned with convex grinds with a slack belt or sandpaper with some give to it, rather than sharpening the entire primary bevel.
I do not recommend turning your knife with an edge bevel into a scandi grind. If the maker designed the knife to have an edge bevel, than turning it into a scandi grind will often make the blade too thin and will have a weak edge. Only use the scandi grind if the knife originally came with a scandi grind.
Strengths: The theory of sharpening a Scandi is easy to understand. Often has a strong edge that doesn't chip easily (depending on grind angle)
Weaknesses: Not as good at slicing as other grinds. In practice, sharpening can be a chore as you have to sharpen the entire bevel (and remove a lot of steel) to sharpen it, assuming no micro-beveling.
Conclusion
The conclusion is different grinds work for different jobs. If you are trying to decide on a blade, think of what you’ll be doing the most to get an idea of which grind is best for you. If you aren’t sure, drop us a line on our Facebook page. We'll talk it over with you.
Back to Articles